Updated 1/2/2024 — For anyone who pays for SquareSpace web hosting, adding simple and flexible tooltip functionality can be done in about 10 minutes. You just need to have a premium SquareSpace subscription – meaning, you pay for the service. Here’s how it works…
1. Add some code to your Code Injection header
You’re going to add jQuery, Popper, and Tippy into your Code Injection header, along with some basic JavaScript. These are terrific libraries that can add a lot of functionality to your site. Because they’re loaded from cdn’s that take advantage of caching, I wouldn’t worry too much about the overhead.
Go to Settings => Utilities => Website Tools => Code Injection
Paste this code into the textarea
<!-- jQuery -->
<script src="//code.jquery.com/jquery-latest.js"></script>
<!-- Popper -->
<script src="https://unpkg.com/@popperjs/core@2"></script>
<!-- Tippy -->
<script src="https://unpkg.com/tippy.js@6"></script>

<script language="javascript">
// This code will execute as soon as the document is loaded
$(document).ready(function() {
    // Allow or disallow html in tooltips (default = false)
    tippy.setDefaultProps({allowHTML: true});
    // Transform elements
    let tooltip_elements = $('a[href^="#tooltip_"]');
    tooltip_elements.each(function(i){
        // Get the href attribute
        let link = $(this).attr('href');
        // The tooltip itself is everything AFTER #tooltip_
        let tip = link.replace('#tooltip_', '');
        $(this).attr('data-tippy-content', tip);
        // Always restyle the link
        $(this).css("cursor", "pointer");
        // Get the [data-url] attribute
        const url = $(this).attr("data-url") || null;
        if (url && (url.startsWith("http") || url.startsWith("#"))) {
          $(this).attr("href", url);
        } else {
          $(this).removeAttr("href");
        }
    });
    // Finally, call `tippy`
    tippy('[data-tippy-content]');
});</script>
Save your changes
Confirm the JavaScript has loaded, and is available on your pages
Go to any page on your web site outside of page edit mode
Open the JavaScript console, and type this:
typeof(jQuery) == 'function' &&
typeof(tippy) == 'function' &&
typeof(Popper) == 'object'
☝🏽The above code should print
trueIf it doesn’t, it’s possible that jQuery is conflicting with other JavaScript on your site – try using jQuery.noConflict()
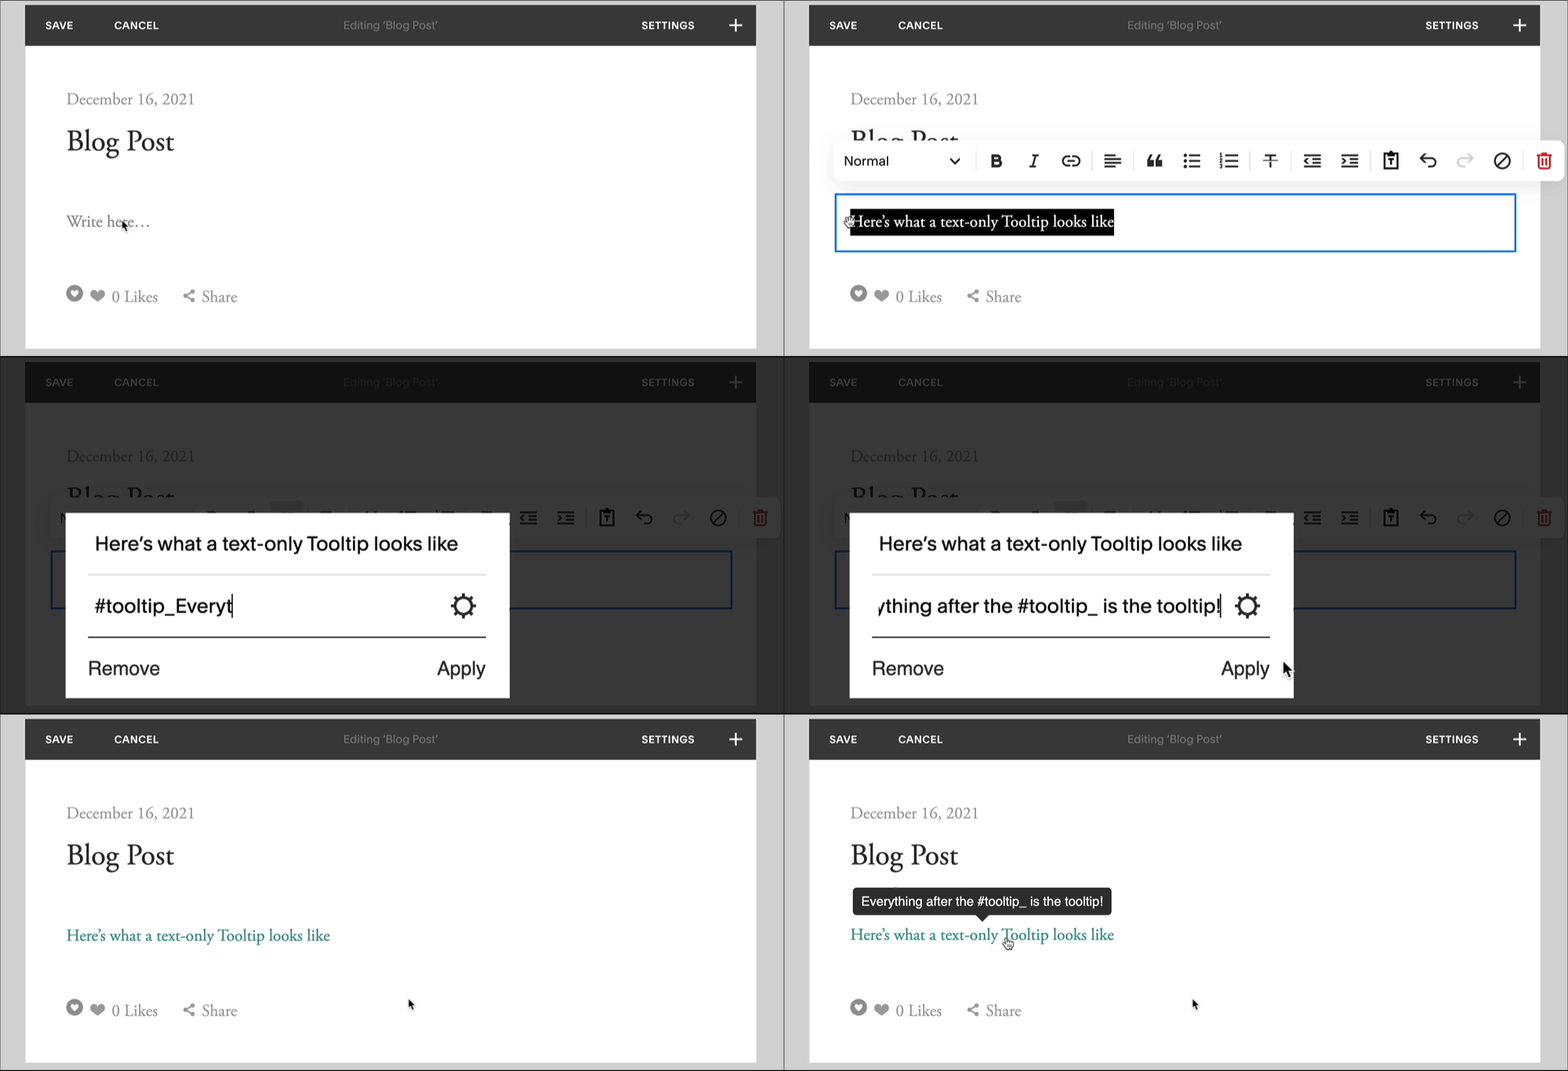
2. Create Tooltips with text only
This is the simplest use case, and can easily be done with the standard link widget. From a page or blog post, add tooltips by creating links whose href attribute is prefixed with #tooltip_. That’s it.
2.1 Create Tooltips with HTML
<a href="#tooltip_<img src='http://45.media.tumblr.com/tumblr_l07k7mdm9y1qzmowao1_400.gif'/>">Shows an animated gif</a>
2.2 Create Tooltips that click through to URLs
Note: The example below only works because of the data-url attribute on the anchor tag, in combination with the JavaScript that transforms each link on your page. You’ll need to use the code widget for this, and NOT the link widget.
Text tooltip with a 😺 cat emoji
<a data-url="https://emojipedia.org/" href="#tooltip_😹 Everything after the underscore IS the tooltip!<br/>By the way, when clicked on, this tooltip will go to https://emojipedia.org.">Text tooltip with a 😺 cat emoji</a>
<a data-url="#namedAnchor" href="#tooltip_This goes to a named anchor">Named anchor link</a>
3. Optionally Style your Tooltips
You can apply style overrides to your tooltips by targeting the following selectors.
/* ----------------------------------------
Note: any modifications to these styles will be global
---------------------------------------- */
.tippy-box {}
.tippy-content {}
.tippy-arrow {}

/* ----------------------------------------
You can also apply tooltip css overrides on the INTERIOR of your tooltips. Note: results may sometimes be unpredictable 😡
---------------------------------------- */
.tippy-box .style1 {
  font-family: courier;
  color: #0066FF;
  padding: 15px;
  display: inline-block;
}
Look at the result
This tooltip’s styling is now overridden by the above css ☝🏽.
<a href="#tooltip_<span class='style1'>This tooltip's styling is overridden.</span>">This tooltip's styling</a> is now overridden by the above css ☝🏽.
Named Anchor
☝🏽 Above this header, there is the following code snippet.
<a name="namedAnchor"></a>
